https://qiita.com/kagamihoge/items/12fbbc2eac5b8a5ac1e0 俺の訳一覧リスト
1. Spring Batch Integration
1.1. Spring Batch Integration Introduction
Spring Batchのユーザの多くはそのスコープ外の機能を必要とする事があり、それらはSpring Integrationで効率的かつ簡潔に実装可能な場合があります。逆に、Spring IntegrationのユーザがSpring Batchの機能を必要としたり両フレームワークの効率的な連携を必要とする場合もあります。これについて、いくつかのパターンとユースケースがあり、Spring Batch Integrationで扱います。
Spring BatchとSpring Integrationの境目は常に明瞭なわけではなく、以下2つのアドバイスが役に立ちます。粒度に気を配り、共通パターンを適用する(Think about granularity, and apply common patterns.)。共通パターンのいくつかは本リファレンスで解説します。
バッチ処理にメッセージング追加によりオペレーション自動化・関心事の分離・strategizing*1が可能となります。例えば、メッセージをジョブ実行のトリガにし、メッセージ送信を様々な方法で行います。または、ジョブが完了もしくは失敗時に、そのイベントがメッセージ送信をトリガし、コンシューマはアプリケーション本体とは無関係な運用上の関心事を行います。メッセージングはジョブ内に埋め込むことも可能です(例えば、チャネルから処理対象のアイテムを読み込んだり書き込んだりする)。リモートパーティショニングとリモートチャンキングは多数のワーカーにワークロードを分散する手段を提供します。
このセクションでは以下のキーコンセプトを解説します。
- Launching Batch Jobs through Messages
- Providing Feedback with Informational Messages
- Asynchronous Processors
- Externalizing Batch Process Execution
1.1.2. Launching Batch Jobs through Messages
コアSpring Batch APIからバッチジョブを開始するには、基本的には以下2つの選択肢があります。
CommandLineJobRunnerのCLI経由。JobOperator.start()もしくはJobLauncher.run()のプログラム経由。
たとえば、シェルスクリプトでBatch Jobsを実行する場合はCommandLineJobRunnerを使います。もしくは、直接JobOperatorを使う場合もあります(webアプリケーションの一部としてSpring Batchを使う場合など)。しかし、さらに複雑なユースケースではどうでしょうか? Batch Job用のデータ取得に(S)FTPにポーリングすつとか、アプリケーションで同時に複数データソースを扱う必要がある場合です。たとえば、web経由のデータファイルだけでなくFTPやその他からも受信する場合です。これはSpring Batch実行前に入力ファイル変換が必要になります。
そこで、Spring Integrationと各種アダプターでバッチジョブ実行が柔軟になります。たとえば、File Inbound Channel Adapterによりファイルシステム上のディレクトリを直接モニタし、入力ファイルが到着したらBatch Jobの開始が出来ます。また、Spring Integration flowsで複数の異なるアダプタを使用し、設定のみで同時に複数データソースからバッチジョブで使うデータを簡単に取り込めます。Spring Integrationでこれらを実装するのは簡単で、疎結合が容易であり、JobLauncherのイベント駆動実行が出来ます。
Spring Batch Integrationにはバッチジョブを起動するJobLaunchingMessageHandlerクラスがあります。JobLaunchingMessageHandlerの入力はSpring Integrationのメッセージで、これはJobLaunchRequestのペイロードを持ちます。このクラスは起動するJobとBatch jobの起動に必要なJobParametersのラッパーです。
以下はBatch jobを開始する一般的なSpring Integration message flowのイメージ図です。EIP (Enterprise Integration Patterns) websiteにメッセージングのアイコンとその解説があります。
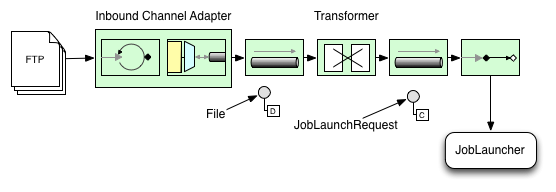
Figure 1. Launch Batch Job
Transforming a file into a JobLaunchRequest
package io.spring.sbi;

import org.springframework.batch.core.Job;
import org.springframework.batch.core.JobParametersBuilder;
import org.springframework.batch.integration.launch.JobLaunchRequest;
import org.springframework.integration.annotation.Transformer;
import org.springframework.messaging.Message;

import java.io.File;

public class FileMessageToJobRequest {
    private Job job;
    private String fileParameterName;

    public void setFileParameterName(String fileParameterName) {
        this.fileParameterName = fileParameterName;
    }

    public void setJob(Job job) {
        this.job = job;
    }

    @Transformer
    public JobLaunchRequest toRequest(Message<File> message) {
        JobParametersBuilder jobParametersBuilder =
            new JobParametersBuilder();

        jobParametersBuilder.addString(fileParameterName,
            message.getPayload().getAbsolutePath());

        return new JobLaunchRequest(job, jobParametersBuilder.toJobParameters());
    }
}
The JobExecution Response
バッチジョブを実行すると、JobExecutionを返します。このインスタンスで実行ステータスを確認します。JobExecutionが正常に作成可能であれば、実際の実行が成功するかどうかに関わらず、JobExecutionは常に返されます。
JobExecutionインスタンスが返されるかどうかはTaskExecutor次第です。synchronous(single-threaded) TaskExecutor実装を使う場合、JobExecutionのレスポンスはジョブが完了してから返します。asynchronous TaskExecutorの場合、JobExecutionは即時返します。ユーザはJobExecutionのidを取得(JobExecution.getJobId()を使用)してから、JobExplorerでjobの更新後ステータスをJobRepositoryにクエリーします。詳細については、 Spring Batch reference documentationのQuerying the Repositoryを参照してください。
Spring Batch Integration Configuration
以下の設定はfile inbound-channel-adapterを生成して指定ディレクトリのCSVファイルをリッスンし、そのファイルをtransformer(FileMessageToJobRequest)に渡し、Job Launching Gatewayでjobを起動し、logging-channel-adapterでJobExecutionのログ出力をします。
Java Configuration
@Bean
public FileMessageToJobRequest fileMessageToJobRequest() {
    FileMessageToJobRequest fileMessageToJobRequest = new FileMessageToJobRequest();
    fileMessageToJobRequest.setFileParameterName("input.file.name");
    fileMessageToJobRequest.setJob(personJob());
    return fileMessageToJobRequest;
}

@Bean
public JobLaunchingGateway jobLaunchingGateway() {
    SimpleJobLauncher simpleJobLauncher = new SimpleJobLauncher();
    simpleJobLauncher.setJobRepository(jobRepository);
    simpleJobLauncher.setTaskExecutor(new SyncTaskExecutor());
    JobLaunchingGateway jobLaunchingGateway = new JobLaunchingGateway(simpleJobLauncher);

    return jobLaunchingGateway;
}

@Bean
public IntegrationFlow integrationFlow(JobLaunchingGateway jobLaunchingGateway) {
    return IntegrationFlows.from(Files.inboundAdapter(new File("/tmp/myfiles")).
                    filter(new SimplePatternFileListFilter("*.csv")),
            c -> c.poller(Pollers.fixedRate(1000).maxMessagesPerPoll(1))).
            handle(fileMessageToJobRequest()).
            handle(jobLaunchingGateway).
            log(LoggingHandler.Level.WARN, "headers.id + ': ' + payload").
            get();
}
Example ItemReader Configuration
いま、ファイルのポーリングしてジョブ起動するとして、Spring BatchのItemReaderでjobパラメータ"input.file.name"のディレクトリを使用する設定を行います。bean設定は以下のようになります。
Java Configuration
@Bean
@StepScope
public ItemReader sampleReader(@Value("#{jobParameters[input.file.name]}") String resource) {
...
    FlatFileItemReader flatFileItemReader = new FlatFileItemReader();
    flatFileItemReader.setResource(new FileSystemResource(resource));
...
    return flatFileItemReader;
}
上記例のポイントはResourceプロパティ用に#{jobParameters['input.file.name']}をインジェクトし、ItemReader beanをStep scopeにしています。beanをStepスコープにすることで遅延バインディングが使用可能となり、これによりjobParameters変数にアクセスできます。
1.2. Available Attributes of the Job-Launching Gateway
job-launching gatewayの以下の属性でjobの制御設定が出来ます。
id: 基底Spring bean定義である以下どちらかのインスタンスを識別する。EventDrivenConsumerPollingConsumer(実際の実装はコンポーネントの入力チャネルがSubscribableChannelかPollableChannelかどうかに依存)
auto-startup: エンドポイントがスタートアップ時に自動開始するかのBooleanフラグ。デフォルトtruerequest-channel: エンドポイントの入力MessageChannelreply-channel: 実行結果のJobExecutionペイロードの送り先MessageChannelreply-timeout: リプライチャネルにリプライメッセージが正常に送信されるのをゲートウェイがwaitする時間(ミリ秒)を指定します。超える場合は例外をスローします。この属性はチャネルがブロックする場合にだけ適用します(例、bounded queue channelがフルなど)。また、注意点として、DirectChannelに送信の場合、その実行は送信スレッドで行います。よって、送信オペレーションの失敗はさらに下流のコンポーネントが起こしている可能性があります。reply-timeout属性は基底のMessagingTemplateインスタンスのsendTimeoutプロパティにマップします。未指定の場合、属性のデフォルトは-1 、これの意味は、デフォルトではGatewayは無限にwaitする、になります。job-launcher: オプション。カスタムJobLauncherbeanの参照。未指定ではアダプタはjobLauncherのidで登録するインスタンスを再利用します。デフォルトインスタンスが無い場合、例外をスローします。order: エンドポイントをサブスクライバとしてSubscribableChannelに接続した時の呼び出し順序を指定。
1.3. Sub-Elements
GatewayにPollableChannelからメッセージを受信する場合、グローバルデフォルトのPollerを指定するか、Job Launching GatewayにPoller sub-elementを指定する必要があります。
Java Configuration
@Bean
@ServiceActivator(inputChannel = "queueChannel", poller = @Poller(fixedRate="1000"))
public JobLaunchingGateway sampleJobLaunchingGateway() {
    JobLaunchingGateway jobLaunchingGateway = new JobLaunchingGateway(jobLauncher());
    jobLaunchingGateway.setOutputChannel(replyChannel());
    return jobLaunchingGateway;
}
1.3.1. Providing Feedback with Informational Messages
Spring Batchのjobは長時間実行が可能なので、進行状況の取得が重要な場合があります。たとえば、バッチジョブの一部または全部を失敗する場合、ステークホルダで通知を受けたい場合があります。Spring Batchは以下を通じてそうした情報を収集する仕組みがあります。
- Active polling
- Event-driven listeners
Spring Batchのjobを非同期実行する場合(例えばJob Launching Gatewayを使用)、JobExecutionインスタンスを返します。この場合、継続的にポーリングしてステータス更新するためにJobExecution.getJobId()を使えます。JobExplorerを使用してJobRepositoryからJobExecutionの更新されたインスタンスを取得します。しかし、これは最良とは言えず、イベント駆動がより適しています。
このため、Spring Batchは、3つの汎用リスナーを用意しています。
- StepListener
- ChunkListener
- JobExecutionListener
以下イメージでは、Spring BatchのjobはStepExecutionListenerも設定しています。このとき、Spring Integrationはイベント受信とイベント前後にstepを処理します。たとえば、受信したStepExecutionをRouterでチェックします。チェック結果に基づき、各種処理(例:Mail Outbound Channel Adapterにメッセージをルーティング)が可能で、状態に応じたEmail通知を送信できます。
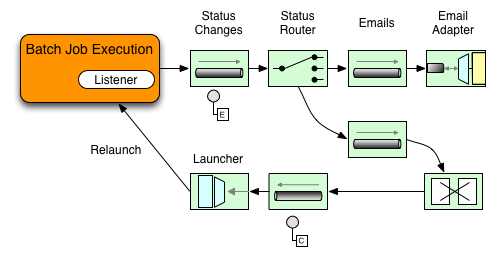
Figure 2. Handling Informational Messages
以下2例は、StepExecutionイベントでGatewayにメッセージ送信するリスナー設定と、その出力をlogging-channel-adapterにログ出力します。
まず、通知インテグレーションのbeanを生成します。
Java Configuration
@Bean
@ServiceActivator(inputChannel = "stepExecutionsChannel")
public LoggingHandler loggingHandler() {
    LoggingHandler adapter = new LoggingHandler(LoggingHandler.Level.WARN);
    adapter.setLoggerName("TEST_LOGGER");
    adapter.setLogExpressionString("headers.id + ': ' + payload");
    return adapter;
}

@MessagingGateway(name = "notificationExecutionsListener", defaultRequestChannel = "stepExecutionsChannel")
public interface NotificationExecutionListener extends StepExecutionListener {}
※ configurationに@IntegrationComponentScanが必要です。
次に、jobにstep-levelリスナーを追加します。
Java Configuration
public Job importPaymentsJob() {
    return jobBuilderFactory.get("importPayments")
        .start(stepBuilderFactory.get("step1")
                .chunk(200)
                .listener(notificationExecutionsListener())
                ...
}
1.3.2. Asynchronous Processors
非同期プロセッサ(Asynchronous Processors)でアイテム処理のスケーリングが出来ます。非同期プロセッサのユースケースでは、AsyncItemProcessorはディスパッチャとして振る舞い、新スレッドでItemProcessorのロジックを実行します。アイテムが完了すると、書き込むためにAsynchItemWriterにFutureが渡されます。
このため、基本的にはfork-joinを実装出来るような、非同期アイテム処理でパフォーマンスが向上する可能性があります。AsyncItemWriterは結果を収集してすべての結果が利用可能になり次第chunkにwrite backします。
以下はAsyncItemProcessor設定例です。
Java Configuration
@Bean
public AsyncItemProcessor processor(ItemProcessor itemProcessor, TaskExecutor taskExecutor) {
    AsyncItemProcessor asyncItemProcessor = new AsyncItemProcessor();
    asyncItemProcessor.setTaskExecutor(taskExecutor);
    asyncItemProcessor.setDelegate(itemProcessor);
    return asyncItemProcessor;
}
delegateプロパティはItemProcessor beanを設定し、taskExecutorプロパティは適当なTaskExecutorを設定します。
以下はAsyncItemWriterの設定例です。
Java Configuration
@Bean
public AsyncItemWriter writer(ItemWriter itemWriter) {
    AsyncItemWriter asyncItemWriter = new AsyncItemWriter();
    asyncItemWriter.setDelegate(itemWriter);
    return asyncItemWriter;
}
こちらも、delegateプロパティには実際の処理をするItemWriter beanを設定します。
1.3.3. Externalizing Batch Process Execution
これまでの解説ではSpring IntegrationがSpring Batchをラップするユースケースを見てきました。しかし、Spring Batchが内部的にSpring Integrationを使うことも可能です。この場合、Spring Batchのユーザは外部プロセスにアイテム処理あるいはchunkをデリゲートします。これにより複雑な処理の負荷軽減が可能です。Spring Batch Integrationは以下のための専用機能があります。
- Remote Chunking
- Remote Partitioning
Remote Chunking
Figure 3. Remote Chunking
ChunkMessageChannelItemWriterでchunk処理を外部化し、アイテムを外に送信して結果を収集します。送信すると、Spring Batchは読み込みとアイテムのグループ化を継続し、結果待ちをしません。ChunkMessageChannelItemWriterは結果の収集と統合をしてSpring Batchに処理を戻します。
Spring Integrationを使用して、処理のコンカンレンシーを完全に制御します(DirectChannelの代わりにQueueChannelを使用するなど)。 Channel Adapters (JMSやAMQPなど)のSpring Integrationリッチコレクションに依存することで、Batchジョブのchunkを外部システムに分散出来ます。
remote chunkするstepのシンプルなjobは以下のような設定になります。
Java Configuration
public Job chunkJob() {
     return jobBuilderFactory.get("personJob")
             .start(stepBuilderFactory.get("step1")
                     .<Person, Person>chunk(200)
                     .reader(itemReader())
                     .writer(itemWriter())
                     .build())
             .build();
 }
ItemReaderにはマスターでデータ読み込みに使用するbeanを指定します。ItemWriterには上述の専用ItemWriter(ChunkMessageChannelItemWriter)を指定します。processor(必要であれば設定)はマスターの設定にはありませんが、これはワーカーで設定します。以下の設定は基本的なマスターのセットアップです。必要に応じて、スロットルリミットなど、コンポーネントのプロパティを設定してください。
Java Configuration
@Bean
public org.apache.activemq.ActiveMQConnectionFactory connectionFactory() {
    ActiveMQConnectionFactory factory = new ActiveMQConnectionFactory();
    factory.setBrokerURL("tcp://localhost:61616");
    return factory;
}

/*
 * Configure outbound flow (requests going to workers)
 */
@Bean
public DirectChannel requests() {
    return new DirectChannel();
}

@Bean
public IntegrationFlow outboundFlow(ActiveMQConnectionFactory connectionFactory) {
    return IntegrationFlows
            .from(requests())
            .handle(Jms.outboundAdapter(connectionFactory).destination("requests"))
            .get();
}

/*
 * Configure inbound flow (replies coming from workers)
 */
@Bean
public QueueChannel replies() {
    return new QueueChannel();
}

@Bean
public IntegrationFlow inboundFlow(ActiveMQConnectionFactory connectionFactory) {
    return IntegrationFlows
            .from(Jms.messageDrivenChannelAdapter(connectionFactory).destination("replies"))
            .channel(replies())
            .get();
}

/*
 * Configure the ChunkMessageChannelItemWriter
 */
@Bean
public ItemWriter<Integer> itemWriter() {
    MessagingTemplate messagingTemplate = new MessagingTemplate();
    messagingTemplate.setDefaultChannel(requests());
    messagingTemplate.setReceiveTimeout(2000);
    ChunkMessageChannelItemWriter<Integer> chunkMessageChannelItemWriter
            = new ChunkMessageChannelItemWriter<>();
    chunkMessageChannelItemWriter.setMessagingOperations(messagingTemplate);
    chunkMessageChannelItemWriter.setReplyChannel(replies());
    return chunkMessageChannelItemWriter;
}
上の設定ではいくつかのbeanを設定しています。ActiveMQでメッセージングミドルウェアと、Spring Integrationのinbound/outbound JMSアダプタを設定しています。前述のitemWriter beanはjob stepで参照しており、ChunkMessageChannelItemWriterでメッセージングを介してchunkを書き込みます。
次にワーカーの設定を見ていきます。
Java Configuration
@Bean
public org.apache.activemq.ActiveMQConnectionFactory connectionFactory() {
    ActiveMQConnectionFactory factory = new ActiveMQConnectionFactory();
    factory.setBrokerURL("tcp://localhost:61616");
    return factory;
}

/*
 * Configure inbound flow (requests coming from the master)
 */
@Bean
public DirectChannel requests() {
    return new DirectChannel();
}

@Bean
public IntegrationFlow inboundFlow(ActiveMQConnectionFactory connectionFactory) {
    return IntegrationFlows
            .from(Jms.messageDrivenChannelAdapter(connectionFactory).destination("requests"))
            .channel(requests())
            .get();
}

/*
 * Configure outbound flow (replies going to the master)
 */
@Bean
public DirectChannel replies() {
    return new DirectChannel();
}

@Bean
public IntegrationFlow outboundFlow(ActiveMQConnectionFactory connectionFactory) {
    return IntegrationFlows
            .from(replies())
            .handle(Jms.outboundAdapter(connectionFactory).destination("replies"))
            .get();
}

/*
 * Configure the ChunkProcessorChunkHandler
 */
@Bean
@ServiceActivator(inputChannel = "requests", outputChannel = "replies")
public ChunkProcessorChunkHandler<Integer> chunkProcessorChunkHandler() {
    ChunkProcessor<Integer> chunkProcessor
            = new SimpleChunkProcessor<>(itemProcessor(), itemWriter());
    ChunkProcessorChunkHandler<Integer> chunkProcessorChunkHandler
            = new ChunkProcessorChunkHandler<>();
    chunkProcessorChunkHandler.setChunkProcessor(chunkProcessor);
    return chunkProcessorChunkHandler;
}
これら設定項目の多くはマスターのものと似通っています。ワーカーはSpring Batch JobRepositoryにもjob設定にもアクセスしません。中核のbeanはchunkProcessorChunkHandlerです。ChunkProcessorChunkHandlerのchunkProcessorプロパティはSimpleChunkProcessorを取り、これはItemWriter(とオプションでItemProcessor)を指定し、これ(ら)がマスターからchunk受信時にワーカーで動作します。
詳細については、Remote Chunkingの"Scalability"チャプターを参照してください。
4.1以降、Spring Batch Integrationはremote chunkingセットアップの簡素化用に@EnableBatchIntegrationを追加しました。これによりアプリケーションコンテキストに2つのbeanを作ります。
RemoteChunkingMasterStepBuilderFactory: マスターstepの設定に使用RemoteChunkingWorkerBuilder: リモートワーカのintegration flow設定に使用
これらAPIは以下図のように多数のコンポーネントの設定に使用します。
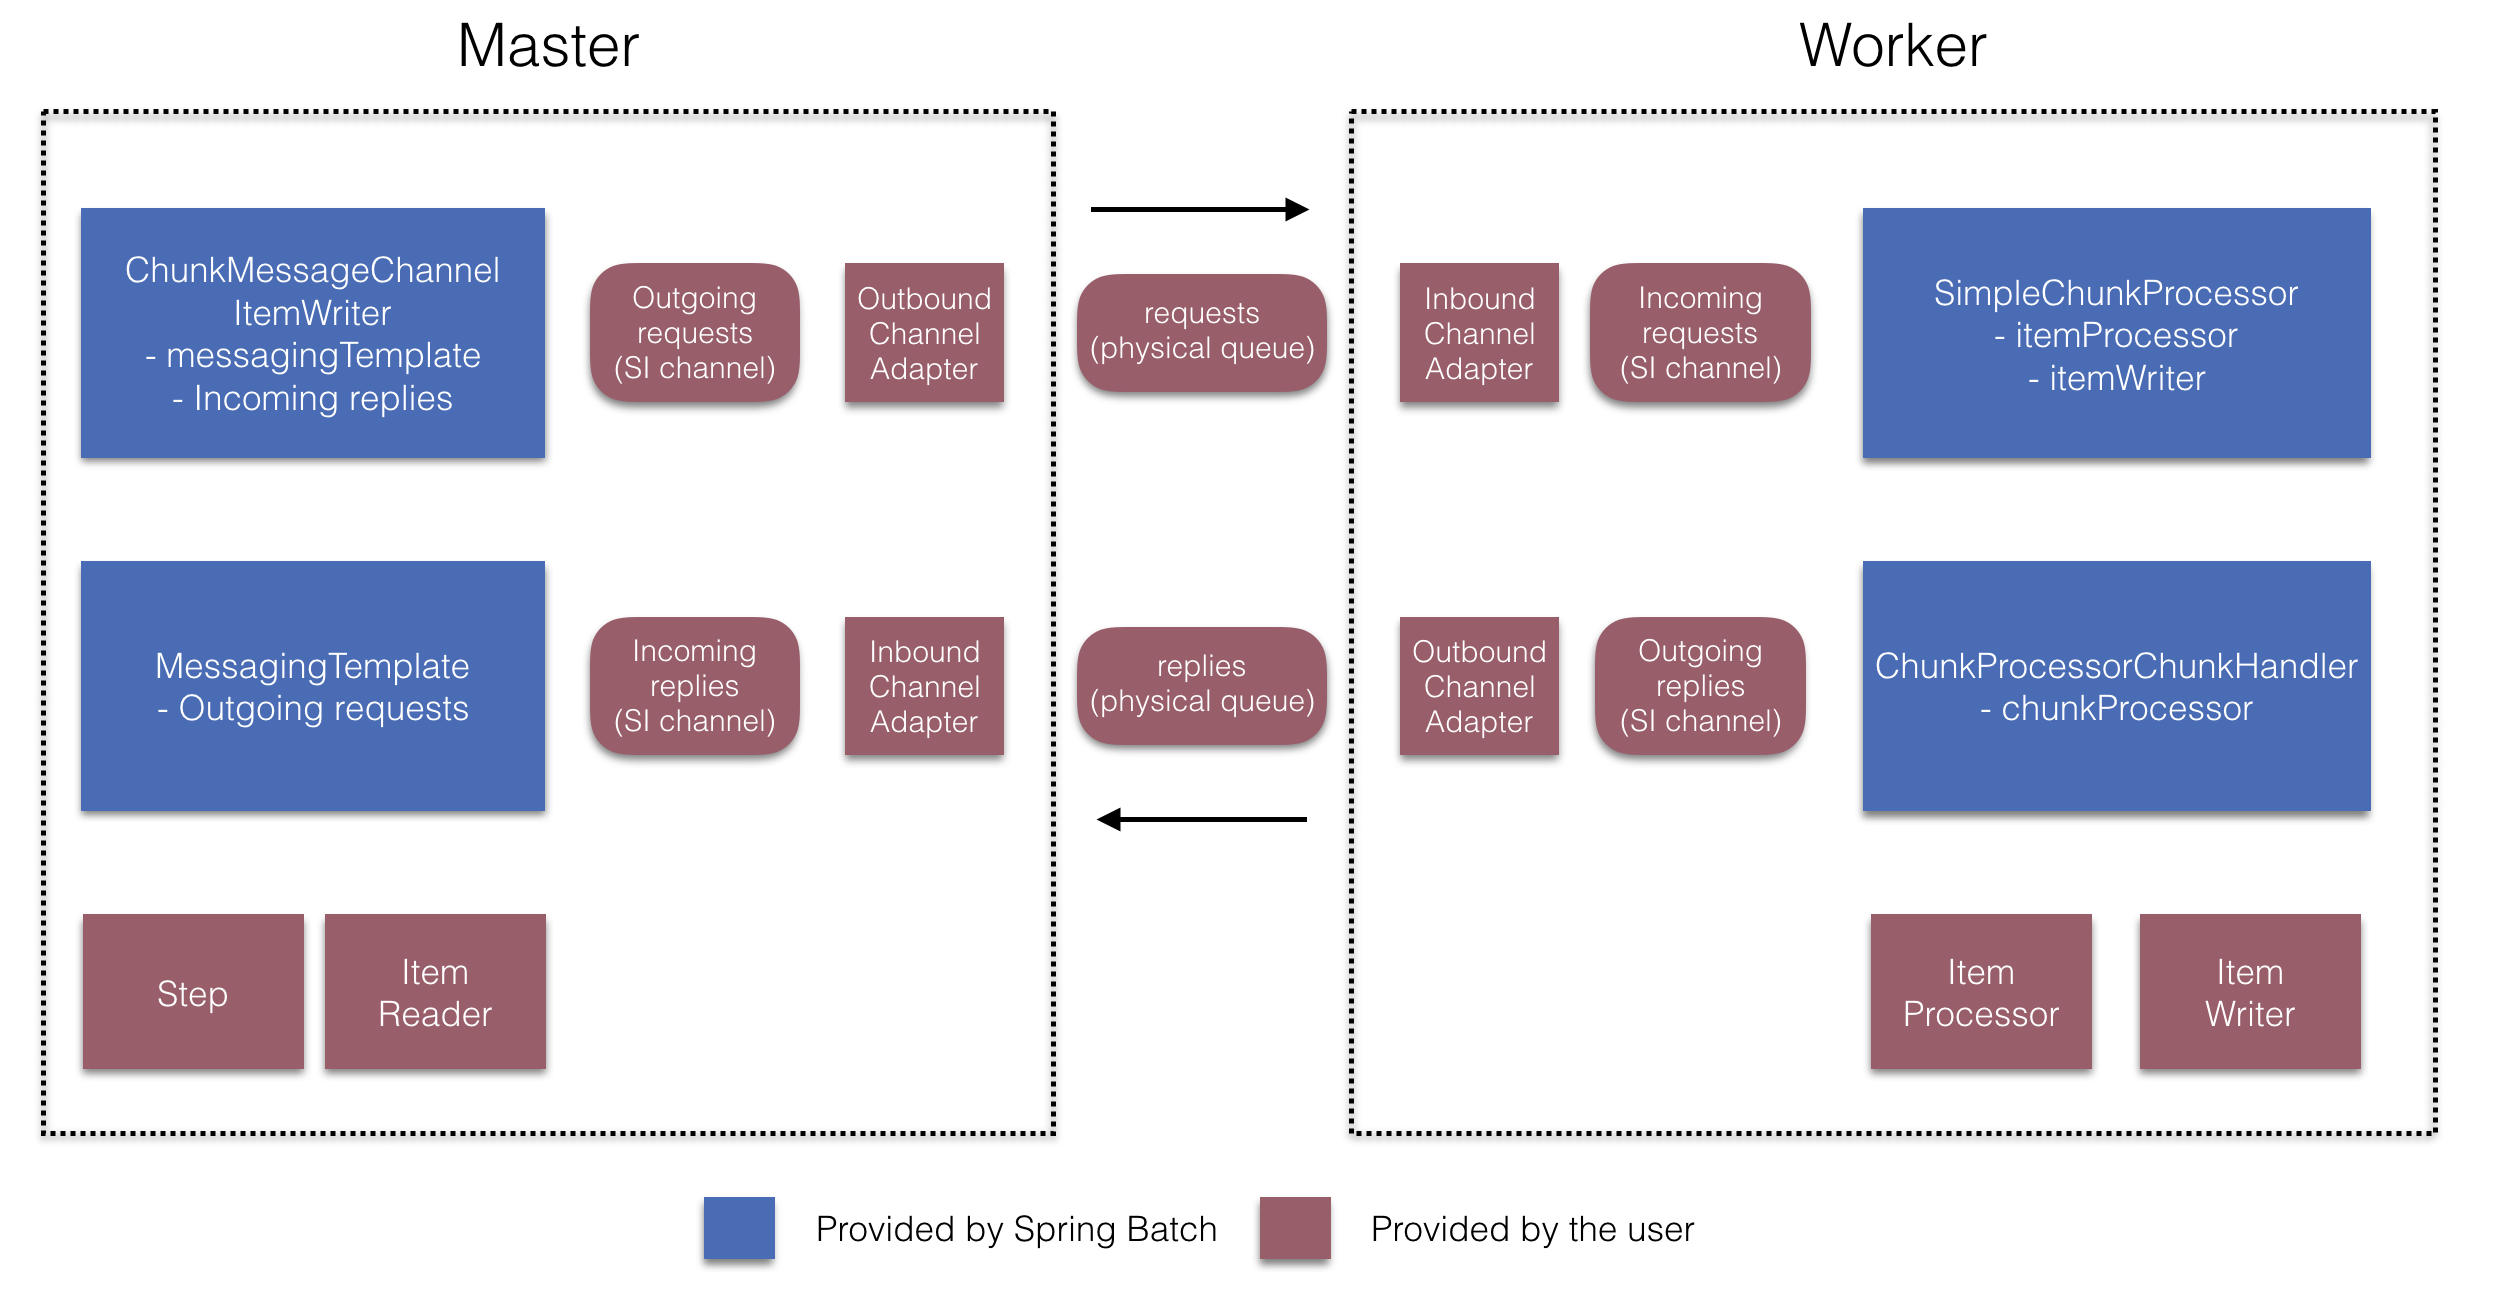
Figure 4. Remote Chunking Configuration
マスター側では、以下の宣言によりマスターstepを設定します。
- アイテム読み込みとワーカー送信用のreader
- ワーカーにリクエストを送信する出力チャネル(リクエスト送信("Outgoing requests"))
- ワーカーから返信を受信する入力チャネル(返信受信("Incoming replies"))
ChunkMessageChannelItemWriterとMessagingTemplateの明示的な設定は必要ありません(必要であれば明示的な設定を行う)。
ワーカー側では、RemoteChunkingWorkerBuilderでワーカーに以下を設定します。
- 入力チャネルでマスターが送信したリクエストをリッスン(リクエスト受信("Incoming requests"))
- 各リクエストに対し
ChunkProcessorChunkHandlerのhandleChunkメソッドを介してItemProcessorとItemWriterを呼び出す。 - 出力チャネルでマスターに返信を送信(返信送信"Outgoing replies")
SimpleChunkProcessorとChunkProcessorChunkHandlerの明示的な設定は必要ありません(必要であれば明示的な設定を行う)。
以下はこれらAPIの設定例です。
@EnableBatchIntegration
@EnableBatchProcessing
public class RemoteChunkingJobConfiguration {

    @Configuration
    public static class MasterConfiguration {

        @Autowired
        private RemoteChunkingMasterStepBuilderFactory masterStepBuilderFactory;

        @Bean
        public TaskletStep masterStep() {
            return this.masterStepBuilderFactory.get("masterStep")
                       .chunk(100)
                       .reader(itemReader())
                       .outputChannel(requests()) // リクエストをワーカーに送信
                       .inputChannel(replies())   // ワーカーから返信を受信
                       .build();
        }

        // ミドルウェアのbeanをここでセットアップ(詳細省略)

    }

    @Configuration
    public static class WorkerConfiguration {

        @Autowired
        private RemoteChunkingWorkerBuilder workerBuilder;

        @Bean
        public IntegrationFlow workerFlow() {
            return this.workerBuilder
                       .itemProcessor(itemProcessor())
                       .itemWriter(itemWriter())
                       .inputChannel(requests()) // リクエストをマスターから受信
                       .outputChannel(replies()) // マスターに返信を送信
                       .build();
        }

        // ミドルウェアのbeanをここでセットアップ(詳細省略)

    }

}
remote chunking jobのより複雑な例についてはこちらを参照してください。
Remote Partitioning

Figure 5. Remote Partitioning
Remote Partitioningはアイテム処理ではなくボトルネックを引き起こすI/O関連で有効です。Remote Partitioningの場合、Spring Batchのstepを実行するワーカーに処理を外出しします。このため、ワーカーはItemReader, ItemProcessor, ItemWriterを持ちます。これ用に、Spring Batch IntegrationにはMessageChannelPartitionHandlerがあります
PartitionHandlerの実装はMessageChannelを使用してリモートワーカに指示を出してそのレスポンスを受け取ります。これらはリモートワーカと通信するのに使う(JMSとAMQPなど)トランポートのクラス群です。
"Scalability"チャプターのセクションのremote partitioningでは、リモートパーティショニングの概念と設定に必要なコンポーネントの概要と、ジョブ実行を複数のローカルスレッドにパーティショニングするデフォルトのTaskExecutorPartitionHandlerを使うサンプルについて、解説しています。複数JVMにリモートパーティショニングするには、追加で以下2つのコンポーネントが必要です。
- A remoting fabric or grid environment
- remoting fabricあるいはgrid environmentを使用する
PartitionHandler実装。
remote chunking同様、JMSを"remoting fabric"に使えます。その場合、上述の通り、PartitionHandler実装にMessageChannelPartitionHandlerを使います。以下のサンプルはpartitioned jobが設定済みとして、JMS設定とMessageChannelPartitionHandlerの例です。
Java Configuration
/*
 * Configuration of the master side
 */
@Bean
public PartitionHandler partitionHandler() {
    MessageChannelPartitionHandler partitionHandler = new MessageChannelPartitionHandler();
    partitionHandler.setStepName("step1");
    partitionHandler.setGridSize(3);
    partitionHandler.setReplyChannel(outboundReplies());
    MessagingTemplate template = new MessagingTemplate();
    template.setDefaultChannel(outboundRequests());
    template.setReceiveTimeout(100000);
    partitionHandler.setMessagingOperations(template);
    return partitionHandler;
}

@Bean
public QueueChannel outboundReplies() {
    return new QueueChannel();
}

@Bean
public DirectChannel outboundRequests() {
    return new DirectChannel();
}

@Bean
public IntegrationFlow outboundJmsRequests() {
    return IntegrationFlows.from("outboundRequests")
            .handle(Jms.outboundGateway(connectionFactory())
                    .requestDestination("requestsQueue"))
            .get();
}

@Bean
@ServiceActivator(inputChannel = "inboundStaging")
public AggregatorFactoryBean partitioningMessageHandler() throws Exception {
    AggregatorFactoryBean aggregatorFactoryBean = new AggregatorFactoryBean();
    aggregatorFactoryBean.setProcessorBean(partitionHandler());
    aggregatorFactoryBean.setOutputChannel(outboundReplies());
    // configure other propeties of the aggregatorFactoryBean
    return aggregatorFactoryBean;
}

@Bean
public DirectChannel inboundStaging() {
    return new DirectChannel();
}

@Bean
public IntegrationFlow inboundJmsStaging() {
    return IntegrationFlows
            .from(Jms.messageDrivenChannelAdapter(connectionFactory())
                    .configureListenerContainer(c -> c.subscriptionDurable(false))
                    .destination("stagingQueue"))
            .channel(inboundStaging())
            .get();
}

/*
 * Configuration of the worker side
 */
@Bean
public StepExecutionRequestHandler stepExecutionRequestHandler() {
    StepExecutionRequestHandler stepExecutionRequestHandler = new StepExecutionRequestHandler();
    stepExecutionRequestHandler.setJobExplorer(jobExplorer);
    stepExecutionRequestHandler.setStepLocator(stepLocator());
    return stepExecutionRequestHandler;
}

@Bean
@ServiceActivator(inputChannel = "inboundRequests", outputChannel = "outboundStaging")
public StepExecutionRequestHandler serviceActivator() throws Exception {
    return stepExecutionRequestHandler();
}

@Bean
public DirectChannel inboundRequests() {
    return new DirectChannel();
}

public IntegrationFlow inboundJmsRequests() {
    return IntegrationFlows
            .from(Jms.messageDrivenChannelAdapter(connectionFactory())
                    .configureListenerContainer(c -> c.subscriptionDurable(false))
                    .destination("requestsQueue"))
            .channel(inboundRequests())
            .get();
}

@Bean
public DirectChannel outboundStaging() {
    return new DirectChannel();
}

@Bean
public IntegrationFlow outboundJmsStaging() {
    return IntegrationFlows.from("outboundStaging")
            .handle(Jms.outboundGateway(connectionFactory())
                    .requestDestination("stagingQueue"))
            .get();
}
また、以下サンプルのようにhandler属性にpartitionHandler beanを設定をしてください。
Java Configuration
        public Job personJob() {
                return jobBuilderFactory.get("personJob")
                                .start(stepBuilderFactory.get("step1.master")
                                                .partitioner("step1.worker", partitioner())
                                                .partitionHandler(partitionHandler())
                                                .build())
                                .build();
        }
リモートパーティショニングのjobのより複雑な例についてはこちらを参照してください。
リモートパーティショニングのセットアップを簡易化するための@EnableBatchIntegrationがあります。このアノテーションはリモートパーティショニングの2つのbeanを提供します。
RemotePartitioningMasterStepBuilderFactory: マスターのstepを設定するのに使用。RemotePartitioningWorkerStepBuilderFactory: ワーカーのstepを設定するのに使用。
これらAPIは以下図のように多数のコンポーネントの設定に使用します。
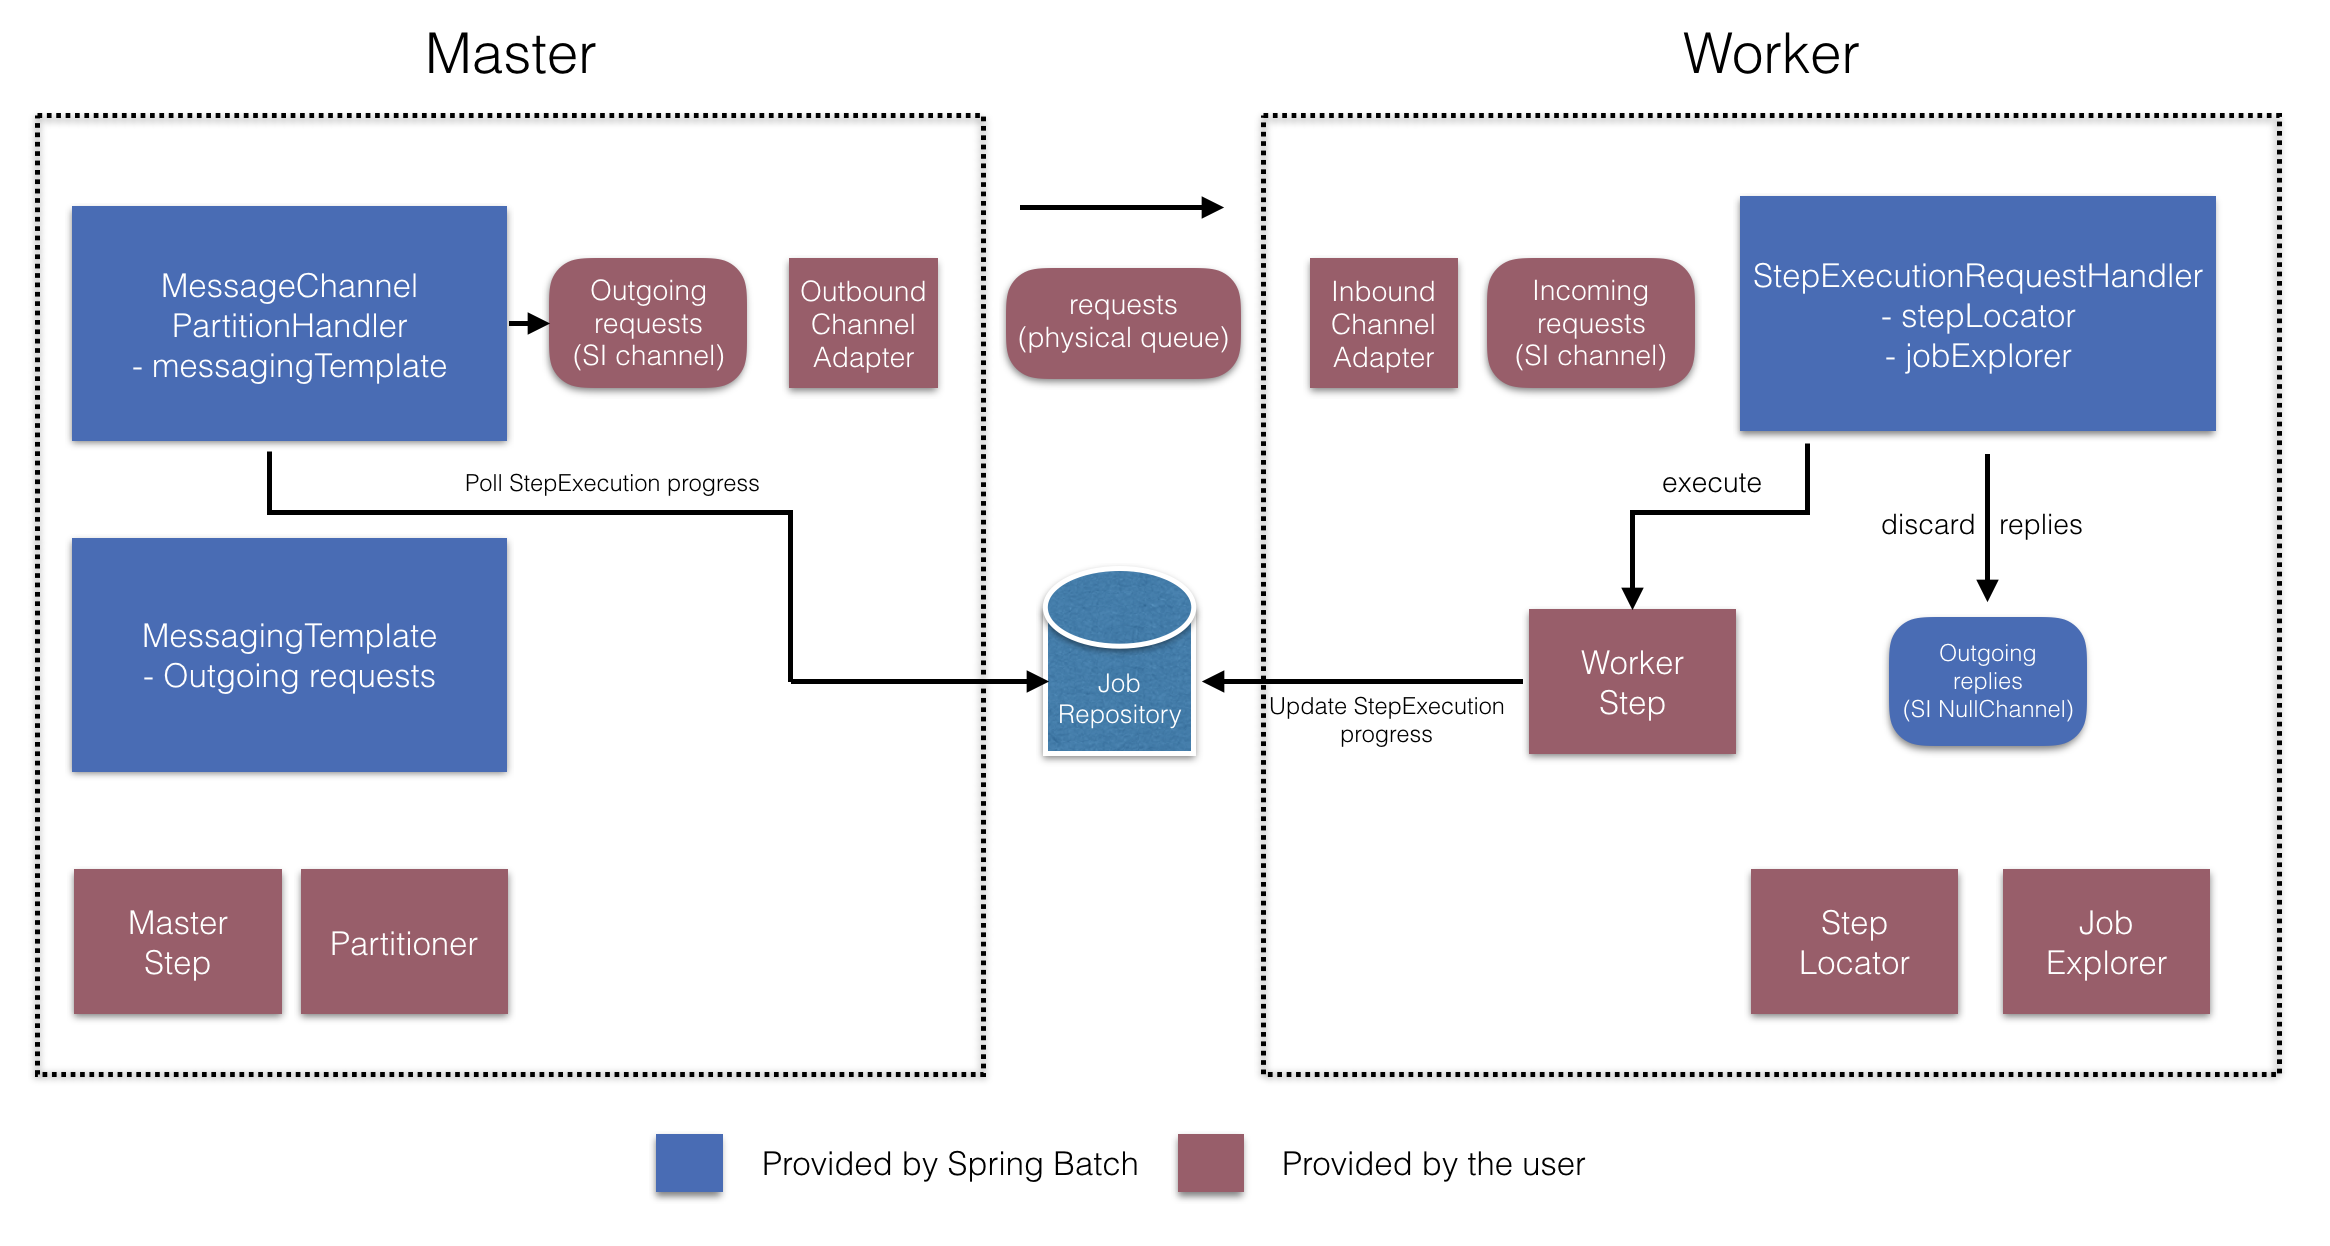
Figure 6. Remote Partitioning Configuration (with job repository polling)
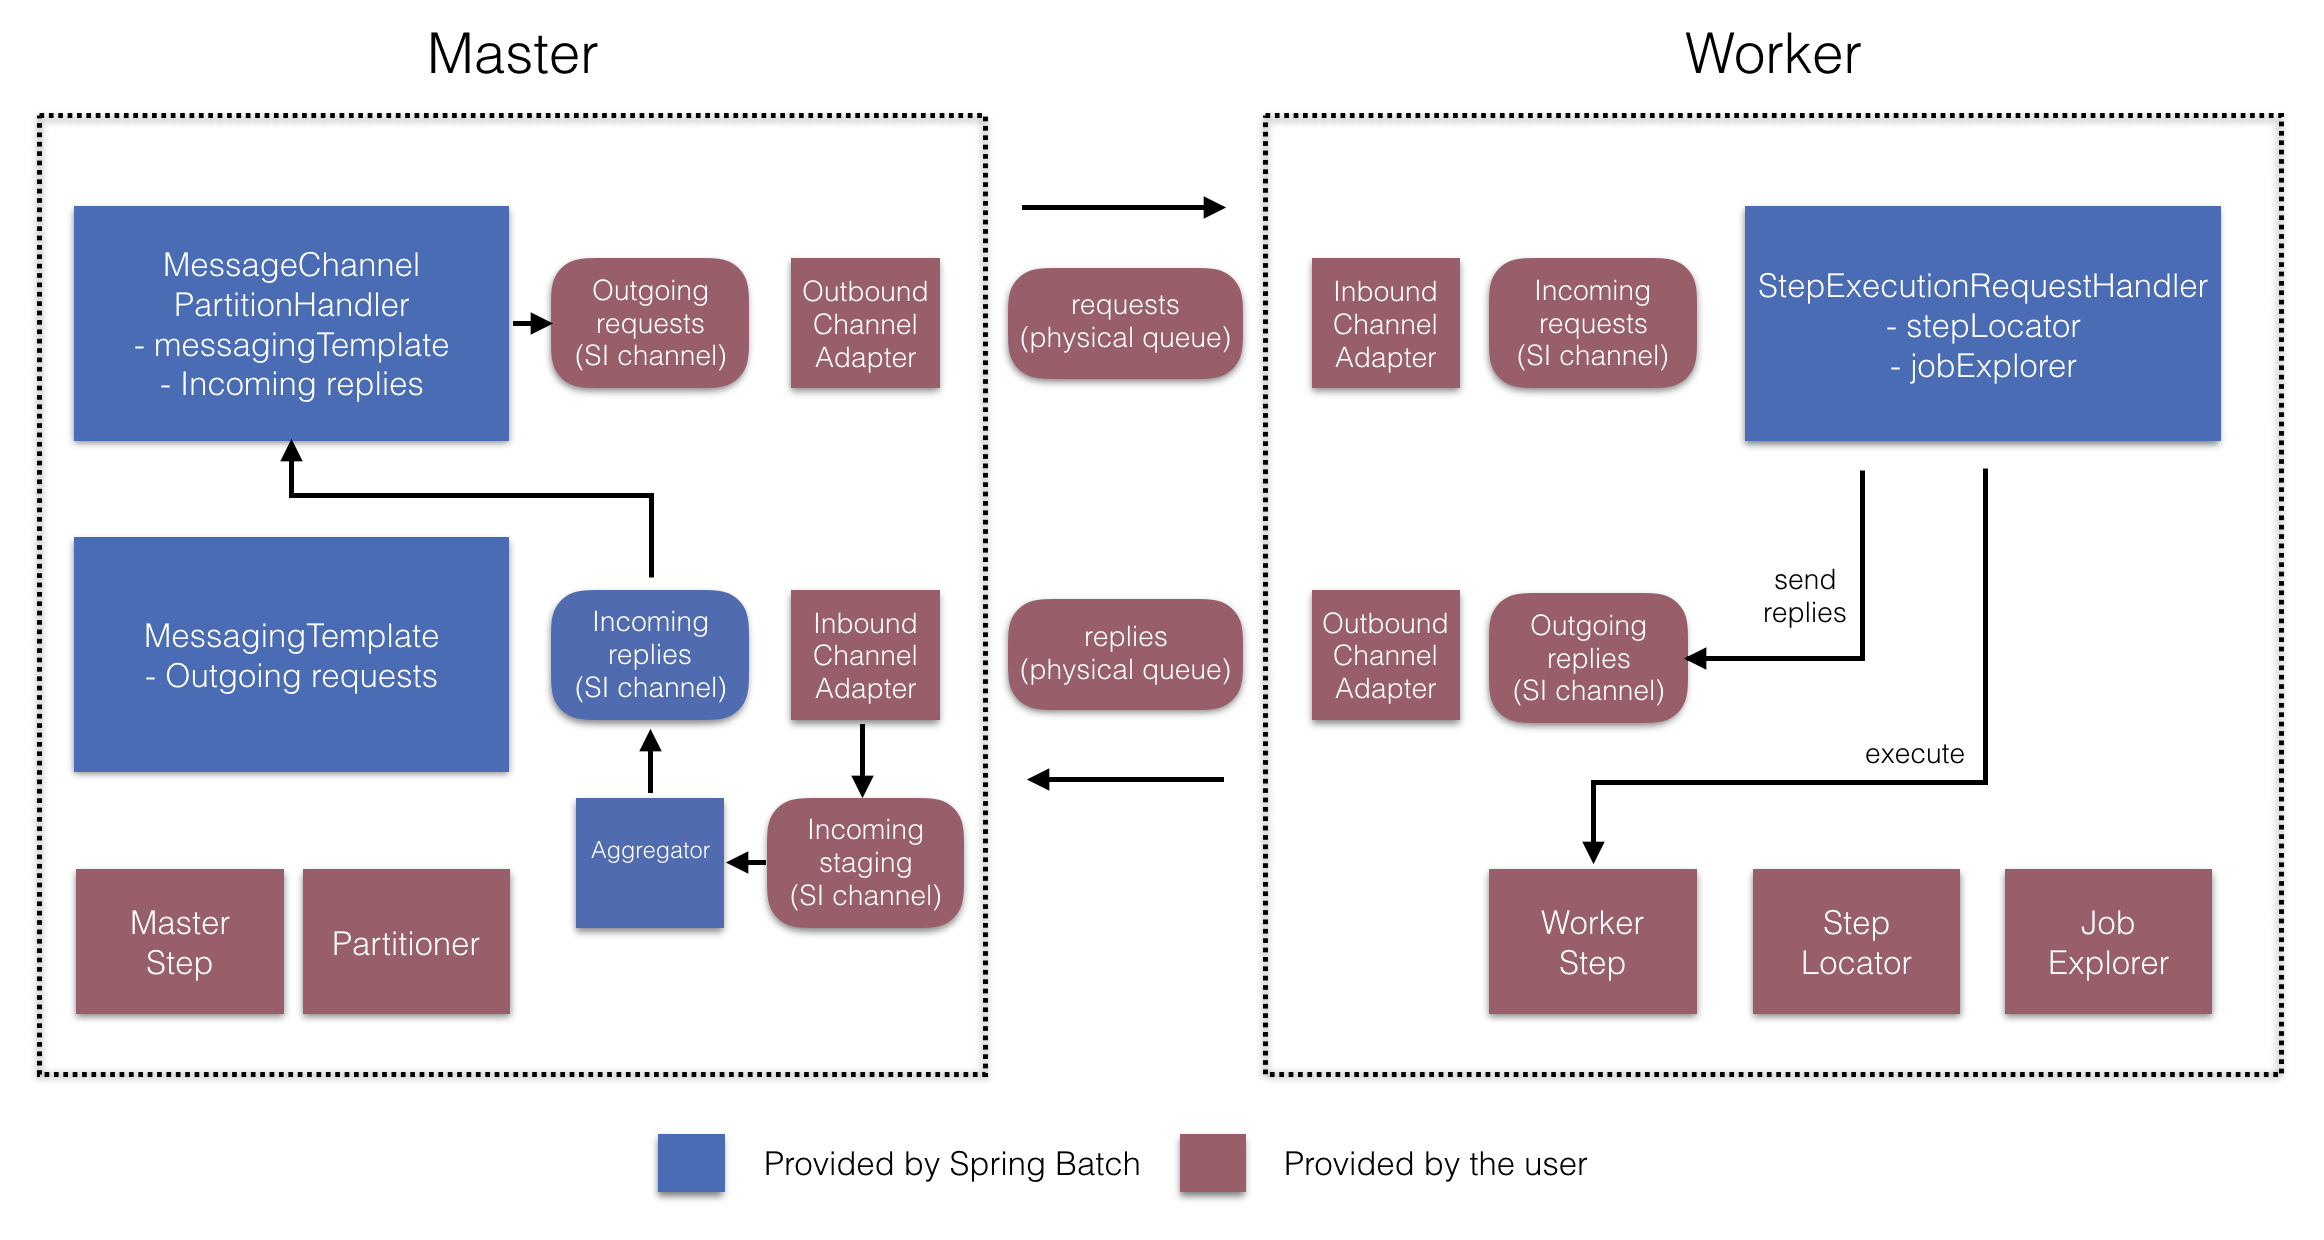
Figure 7. Remote Partitioning Configuration (with replies aggregation)
マスター側では、RemotePartitioningMasterStepBuilderFactoryを使用して以下を宣言することでマスターstepを設定します。
- データをパーティション化するのに使用する
Partitioner - ワーカーにリクエスト送信するための出力チャネル ("Outgoing requests")
- ワーカーからの返信を受信するための入力チャネル("Incoming replies")(replies aggregation設定時)
- ポーリングのインターバルとタイムアウト(job repository polling設定時)
MessageChannelPartitionHandlerとMessagingTemplateの明示的な設定は必要ありません(必要な場合は設定する)。
反対のワーカー側では、RemotePartitioningWorkerStepBuilderFactoryを使用してワーカーを設定します。
- 入力チャネルでマスターからのリクエスト送信をリッスンする("Incoming requests")
- リクエストに対して
StepExecutionRequestHandlerのhandleメソッドを呼ぶ。 - マスターに出力チャネルを通じて返信を送信する("Outgoing replies")
StepExecutionRequestHandlerの明示的な設定は必要ありません(必要な場合は設定する)。
これらのAPIの使用例は以下の通りです。
@Configuration
@EnableBatchProcessing
@EnableBatchIntegration
public class RemotePartitioningJobConfiguration {

    @Configuration
    public static class MasterConfiguration {

        @Autowired
        private RemotePartitioningMasterStepBuilderFactory masterStepBuilderFactory;

        @Bean
        public Step masterStep() {
                 return this.masterStepBuilderFactory
                    .get("masterStep")
                    .partitioner("workerStep", partitioner())
                    .gridSize(10)
                    .outputChannel(outgoingRequestsToWorkers())
                    .inputChannel(incomingRepliesFromWorkers())
                    .build();
        }

        // Middleware beans setup omitted

    }

    @Configuration
    public static class WorkerConfiguration {

        @Autowired
        private RemotePartitioningWorkerStepBuilderFactory workerStepBuilderFactory;

        @Bean
        public Step workerStep() {
                 return this.workerStepBuilderFactory
                    .get("workerStep")
                    .inputChannel(incomingRequestsFromMaster())
                    .outputChannel(outgoingRepliesToMaster())
                    .chunk(100)
                    .reader(itemReader())
                    .processor(itemProcessor())
                    .writer(itemWriter())
                    .build();
        }

        // Middleware beans setup omitted

    }

}