Reading/Writing to/from Files using FileChannel and ByteBuffer in Java
当ブログでは過去にRandomAccessFileを用いたJavaでの高速IOについてJava NIOチュートリアルの中で解説しました。今回はFileChannelとByteBufferの使用方法について見ていきます。チャネル(Channel)は従来型のInputStreamやOutputStreamとは別の方法で高パフォーマンスのデータを読み込む方法を提供します。また、ブロッキングとノンブロッキングモードでのファイルオープンが可能です。ただし、read/writeチャネルのFileChannlesは常にブロッキングモードで、ノンブロッキングモードには入れられません。RandomAccessFileクラスはバイト配列のようにファイルを処理します。配列の任意の位置でデータの読み書きが出来ます。これの実行には、現在位置を保持するポインタを使用し、ポインタの移動にはseek()などのメソッドを使用します。所定位置に移動後、RandomAccessFileからFileChannelを取得してファイルからのデータ読み込みを開始します。なお、JDK 7にはNIO 2が導入されており、ファイル同様にディレクトリも容易に処理できます*1。詳細についてはAnghel Leonard氏のPro Java 7 NIO.2を参照してください。
How to read/write files using FileChannel and ByteBuffer
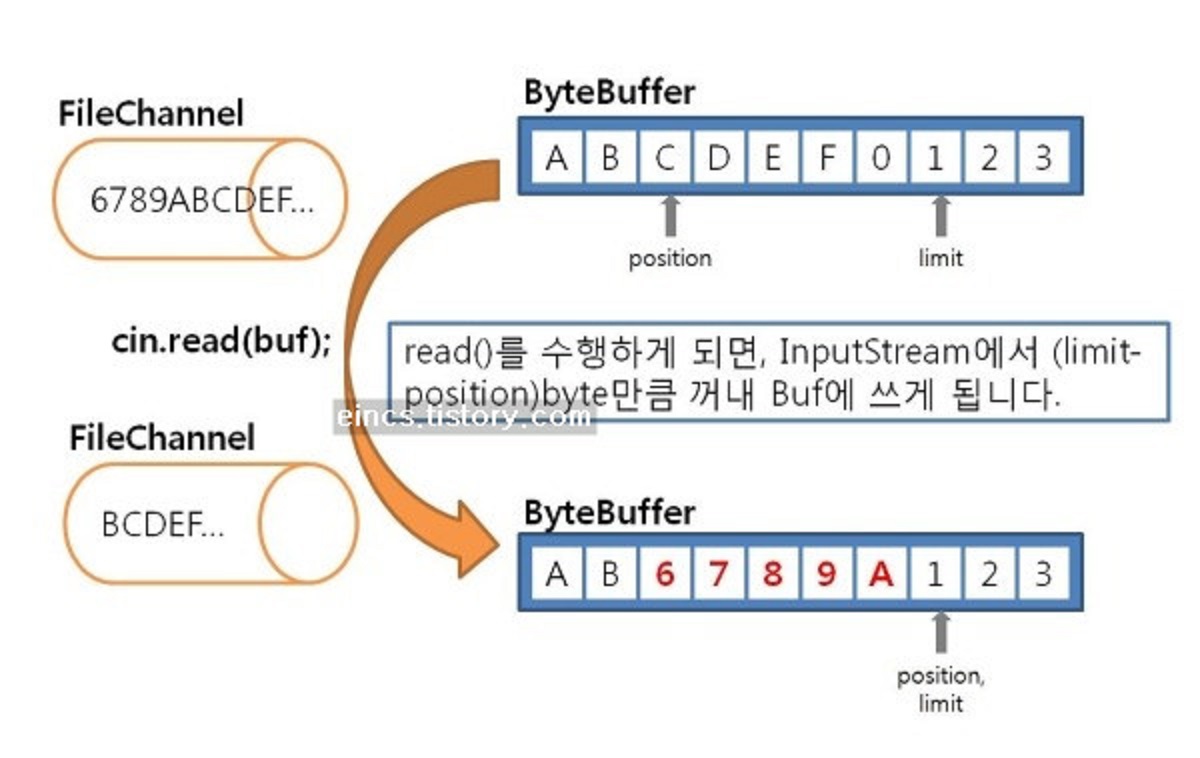
コードに入る前に、Java NIOにおけるチャネルとバッファ(Buffer)の基本概念について復習しておきます。一言で言うならば、バッファはチャネルと共に動作します。チャネルとはデータが転送されるチューブであり、バッファとはデータの転送先および転送元です。書き込みの場合、書き込みたいデータをバッファに配置してチャネルに渡し、それから*2、チャネルはバッファからデータを読み取ってファイルに書き込みます。
読み込みの場合も同様に、ファイルやネットワークなどのソースから、チャネルがデータをバッファに挿入します。読み書きに同一のバッファを使うことが可能で、バッファにデータを書き込んでチャネルがファイルに書き込むそのデータを読むためには、バッファへの書き込む終了後にflip()メソッドを呼ぶ必要があります。flip()メソッドはポインタを変更してバッファからデータを読み込めるようにします。Javaには三種類のバッファdirect, non-direct and mapped bufferがあります。本文書のサンプルではダイレクトバイトバッファ(direct byte buffer)を使います。
Steps to read/write data using FileChannel and Buffer
以下はRandomAccessFile, FileChannel, ByteBufferを使用するファイルからのデータ読み込みを行うための手順です。
- RandomAccessFileをread/writeモードを指定してread/writeしたいファイルを開く。
- FileChannelの取得にRandomAccessFileの
getChannel()を呼ぶ。このメソッドが返すチャネルの位置はgetFilePointer()が返すオブジェクトのファイルポインターオフセットと常に等しい。 ByteBuffer.allocate()メソッドを使用してByteBufferを作成する。putInt(),putLong()などの各種put()系メソッドでByteBufferにデータを格納する。- チャネルがバッファからデータを読み込んでファイルに書き込めるようにするため、バッファをフリップする。filp()メソッドはポインタを変更してバッファからデータを読み込めるようにします。
- FileChannelのwrite()メソッドを呼ぶ。
- FileChannelのクローズ。
- RandomAccessFileのクローズ。
もう一つの重要な点としては、読み書きに同一バッファを使用可能ですが、フリップをする必要があります。次に、JavaのFileChannelとByteBufferでファイルからデータをread/writeするプログラム例を示します。After Memory Mapped File, this is the second fastest way to read and write from a file in Java.
Java Program to read/writes from file using FileChannel and ByteBuffer
以下はFileChannelおよびByteBufferクラスを使用してファイル(バイナリないしテキストファイル)からデータを読み書きするJavaのサンプルプログラムです。このサンプルではPersistableという二つのメソッドpersist()とrecover()を持つインタフェースを使用しています(後述)。オブジェクトがこのインタフェースを実装していればセーブ&ロード可能で、具体的な実装は実装クラスに任せています。つまり、このサンプルのようにチャネルとバッファを使うことも出来れば、従来型のread/writeを取ることも出来ます。
import java.io.FileNotFoundException;
import java.io.IOException;
import java.io.RandomAccessFile;
import java.nio.ByteBuffer;
import java.nio.channels.FileChannel;

/**
 * Java Program to read and write on RandomAccessFile in Java
 * using FileChannle and ByteBuffer.
 *
 * @author Javin
 */
public class FileChannelDemo {

    public static void main(String args[]) {

        Tablet ipad = new Tablet("Apple", true, 1000);
        System.out.println("Writing into RandomAcessFile : " + ipad);
        write("tablet.store", ipad);

        Tablet fromStore = new Tablet();
        read("tablet.store", fromStore);
        System.out.println("Object read from RandomAcessFile : " + fromStore);

    }

    /*
     * Method to write data into File using FileChannel and ByteBuffeer
     */
    public static void write(String filename, Persistable object) {
        try {
            // Creating RandomAccessFile for writing
            RandomAccessFile store = new RandomAccessFile("tablet", "rw");

            // getting FileChannel from file
            FileChannel channel = store.getChannel();

            // creating and initializing ByteBuffer for reading/writing data
            ByteBuffer buffer = ByteBuffer.allocate(2048);

            // an instance of Persistable writing into ByteBuffer
            object.persist(buffer);

            // flip the buffer for writing into file
            buffer.flip();
            int numOfBytesWritten = channel.write(buffer); // writing into File
            System.out.println("number of bytes written : " + numOfBytesWritten);
            channel.close(); // closing file channel
            store.close(); // closing RandomAccess file

        } catch (FileNotFoundException e) {
            e.printStackTrace();
        } catch (IOException e) {
            e.printStackTrace();
        }
    }


    /*
     * Method to read data from File using FileChannel and ByteBuffeer
     */
    public static void read(String filename, Persistable object) {
        try {
            // Opening RandomAccessFile for reading data
            RandomAccessFile store = new RandomAccessFile("tablet", "rw");

            // getting file channel
            FileChannel channel = store.getChannel();

            // preparing buffer to read data from file
            ByteBuffer buffer = ByteBuffer.allocate(1024);

            // reading data from file channel into buffer
            int numOfBytesRead = channel.read(buffer);
            System.out.println("number of bytes read : " + numOfBytesRead);

            // You need to filp the byte buffer before reading
            buffer.flip();

            // Recovering object
            object.recover(buffer);

            channel.close();
            store.close();

        } catch (FileNotFoundException e) {
            e.printStackTrace();
        } catch (IOException e) {
            e.printStackTrace();
        }
    }
}
Persistableインタフェースは読み込みと書き込みを抽象化するものです。このインタフェースの使い方は、抽象化の一例でもあり、仕様と実装を分離しています。このインタフェースは書き込み(persist)と読み込み(recover)とだけ宣言し、それをどう実装するかは未定義です。
interface Persistable {

    public void persist(ByteBuffer buffer);

    public void recover(ByteBuffer buffer);
}
読み込みおよび書き込み可能なPersistableの実装クラスは以下のようになります。
class Tablet implements Persistable {

    private String brand;
    private boolean isCellular;
    private long cost; // in US Dollars

    public Tablet() {
        brand = "";
    }

    public Tablet(String brand, boolean isCellular, long cost) {
        this.brand = brand;
        this.isCellular = isCellular;
        this.cost = cost;
    }

    public final String getBrand() {
        return brand;
    }

    public final boolean isCellular() {
        return isCellular;
    }

    public final long getCost() {
        return cost;
    }

    public final void setBrand(String brand) {
        this.brand = brand;
    }

    public final void setCellular(boolean isCellular) {
        this.isCellular = isCellular;
    }

    public final void setCost(long cost) {
        this.cost = cost;
    }

    @Override
    public void persist(ByteBuffer buffer) {
        byte[] strBytes = brand.getBytes();
        buffer.putInt(strBytes.length);
        buffer.put(strBytes, 0, strBytes.length);
        buffer.put(isCellular == true ? (byte) 1 : (byte) 0);
        buffer.putLong(cost);
    }

    @Override
    public void recover(ByteBuffer buffer) {
        int size = buffer.getInt();
        byte[] rawBytes = new byte[size];
        buffer.get(rawBytes, 0, size);
        this.brand = new String(rawBytes);
        this.isCellular = buffer.get() == 1 ? true : false;
        this.cost = buffer.getLong();
    }

    @Override
    public String toString() {
        return "Tablet [brand=" + brand + ", isCellular=" + isCellular + ", cost=" + cost + "]";
    }

}


Output:
Writing into RandomAcessFile : Tablet [brand=Apple, isCellular=true, cost=1000]
number of bytes written : 18
number of bytes read : 1024
Object read from RandomAcessFile : Tablet [brand=Apple, isCellular=true, cost=1000]
Caution
オブジェクトの内容書き込み後にbyteバッファをフリップしてください。RandomAccessFileにデータを書き込むには、ファイルチャネルはバッファからデータを読み込む必要があるためです。FileChannel.write()呼び出し前にflip()を呼ばない場合、ファイルには何も書き込まれません。
同様に、ファイルからバッファにデータ読み込み後、バッファからデータを読み込むにはフリップを行います。多くのJavaプログラマが書き込み後にフリップをしないミスをして、ファイルには何も書き込まれないし何も読み込まれないので、デバッグに時間を浪費してしまいます。
以上がFileChannelとByteBufferを使用するファイル入出力のやり方です。このデモでは*3、FileChannelとByteBufferを使用してRandomAccessFileを読み書きする例を示しましたが、テキストやバイナリでも同様な方法となります。